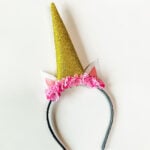
Save money and make this DIY Unicorn Headband with supplies from the dollar store! It is so easy to learn how to make a unicorn headband and your kids will love it!

Unicorns are so fun and whimsical while being popular with kids. This Unicorn Headband is perfect for a Unicorn Party and makes the best party favors.
We have a blast crafting and thought we would try making a DIY Unicorn Headband.
What's in this post: Unicorn Headband
Why We Love This
The entire project was a huge success and really simple to make! The girls loved their new unicorn headband, and we had a lot of fun making it together.
You can purchase all of the supplies from your local dollar store. This is a very frugal craft.
This is perfect for birthday parties and more. No need to buy expensive kits or headbands when you can easily make them at home.
We love using this for a fun craft for a birthday party or you can make a special one for the birthday girl! It is nice to have an activity that also doubles as a party favor!
Another fun craft for kids is Handprint Flowers.
Supplies

- Plastic Headband. You can use any color you like.
- Glitter Foam or Paper. Just make sure it is thick enough so it will be sturdy.
- White and Pink Construction Paper. This is for the ears.
- Fake Flowers. We used pink but you can use your favorite colors or what you have on hand.
Get the complete list of supplies at the bottom of the page.
Step By Step Instructions

Step 1. Cut the glitter foam or paper into the large triangle with the top cut flat. For the cone I created, the base is 7 inches, the sides are 7.5 inches and the top is 1 inch. Also cut the flowers off of the stems. Next cut triangles out of the white (base is 2 inches and sides are both 3 inches) and pink (base is 1 inch and side are both 1.5 inches) construction paper and glue the pink ones onto the white ones. We used school glue for the unicorn ears.

Step 2. Next gently wrap the glitter triangle to form your unicorn horn and seal it with glue. We used hot glue for this process. Cut the base to even out the side if needed.

Step 3. Then place the headband inside the horn and seal with hot glue.

Step 4. Next, glue the ears next to your horn and onto the headband.

Step 5. Then with the hot glue gun, glue the flowers on the front of the headband at the base of the horn and the ears to cover your seams.

Step 6. Now you know how to make your own unicorn headband kit for the perfect hair accessories!

Frequently Asked Questions
We used glitter foam, but you can also use paper. It is super easy to form this into a horn.
It is so easy and only requires a few simple materials. Make sure you have a good glue gun. You will also want to make sure you have extra glue sticks on hand.
More Unicorn Crafts

The kids will love this Unicorn Headband. Make it today and leave a comment. I love hearing your feedback on projects.
DIY Unicorn Headband
Materials
- Plastic Headband
- Glitter Foam or Paper
- White and Pink Construction Paper
- Fake Flowers – We used pink but use your favorite colors or what you have on hand
Instructions
- Cut the glitter foam or paper into the a large triangle with the top cut flat. For the cone I created, the base is 7 inches, the sides are 7.5 inches and the top is 1 inch. Also cut the flowers off of the stems.
- Next cut triangles out of of the white (base is 2 inches and sides are both 3 inches) and pink (base is 1 inch and side are both 1.5 inches) construction paper and glue the pink ones onto the white ones. We used school glue for this process.
- Next gently wrap the glitter triangle to form your unicorn horn and seal it with glue. We used hot glue for this process. Cut the base to even out the side if needed.
- Next place the headband inside the horn and seal with hot glue as well.
- Next glue the ears next to your horn and onto the headband. We used hot glue for this step as well.
- Then with the hot glue gun, glue the flowers on the front of your headband at the base of the horn and the ears to cover your seams.