The kids will have a blast learning How to Make a Dreamcatcher. Get creative and make a fun and whimsical DIY dream catcher today.

Once you learn how to make a dreamcatcher, you will see how super easy these are to make! The kids will absolutely love this DIY activity. Let them pick out colors that will match their room. So fun!
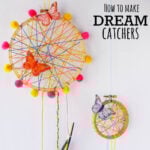
They are bright and cheerful and perfect for any room. They use embroidery hoops so really simple to make! You can embellish these with bright butterflies or whatever you like.
It is so fun to see how each child makes their dream catcher and the colors they choose. It is a great DIY and this simple tutorial will let their creativity shine. Other fun crafts to make that your kids might like is Easy Paper Butterfly Craft for Kids or Love You to Pieces Craft.
What's in this post: How to Make a Dreamcatcher
What is a Dream Catcher?
Traditionally, Native Americans used hoops called dream catchers to protect people while sleeping from bad dreams or nightmares. Hang this by your bed to encourage lots of good dreams at night.
This is seriously so easy and everyone will have a blast making these. Whether you need a rainy day activity or just something to keep the kids busy, this is a great DIY to start with! These simple instructions will help create the best dreamcatcher. We even made a paper plate dreamcatcher!
Materials Needed for a DIY Dream Catcher

- Embroidery Hoops – Use a large is 6″ diameter hoop and small is 3″ hoop. You can even use a metal hoop
- Embroidery Floss – Choose your favorite colors
- Pom Poms – Make with various colors and sizes
- Feathers You can use various colors
- Butterfly Floral Picks – Butterflies are added for sweet dreams
- Low Temperature Hot Glue – Using a hot glue gun allows for the items added to be secured
- Scissors – We recommend adult supervision
Variations and Additions
The dreamcatchers can be made with in a variety of ways and can easily be found at your local craft store. Here are some of our favorite additions that my kids made with theirs.
- Thread Wooden Beads on the embroidery floss with a needle if needed
- You can also use yarn instead of embroidery floss
- Add your favorite color of ribbons
- Gemstones are always a great addition
- Fold a piece of suede lace for a beautiful addition
- Other additions include leather, colorful fabric, and twine. Use a hole punch so you can thread on the dreamcatcher
How to Make a Dream Catcher
- Step 1 – For the 3″ dream catchers, you’ll want to cut your embroidery floss about 18-24″ in length. For the larger, 6″ hoop, you will want to cut your embroidery floss about 30-36″ in length.
- Step 2 – Once your embroidery floss is cut, attach a small dab of glue to the back of the hoop.

Step 3 – Gently press the embroidery floss into the glue and let set to harden on the rim. Loop the floss around the hoop wrapping in any and all directions. Secure the remaining tail or last knot on the back of the hoop with hot glue.

Step 4 – Trim the excess. Repeat for the desired number of colors, attaching it to a different area on the back of the hoop when you begin. When you are finished, cut pieces of embroidery floss and weave them through the bottom of the hoop.

Step 5 – Tie the remaining end around feathers and attach pom poms if desired. Add additional feathers and if you want to be creative, braid three pieces of floss together to create a different look.

Step 6 – Add pom poms and butterflies to your dream catcher to encourage sweet dreams even at the bottom of the dream catcher! Finally add embroidery floss to the top with knot for the hoop to hang!
DIY Dream Catcher Tip
- Embroidery Floss – Don’t separate the embroidery floss. You will use six strands!
- Gluing the Floss – Allow the glue to set on the hoop so that is secure.
- Top of the Hoop – Make sure to leave a 6 inch tail to hang the dreamcatcher.

Where Do You Hang a Dreamcatcher?
A dreamcatcher is traditionally hung in your bedroom over your bed to catch any bad dreams. But other options include near the door or windows. We have even hung on the porch for a great addition to your outdoor space.
The placement of your dreamcatcher is up to you and how meaningful the space is to you.
How to Make a Bigger Dreamcatcher?
If you want to make a bigger dreamcatcher then use a bigger hoop. Making a larger Dreamcatcher feels a larger space such as a living room.

More Fun Ideas for Kids


How to Make a Dream Catcher
Equipment
- Embroidery Hoops – Use a large is 6″ diameter hoop and small is 3″ hoop. You can even use a metal hoop
- Embroidery Floss – Choose your favorite colors
- Pom Poms – Make with various colors and sizes
- Feathers You can use various colors
- Butterfly Floral Picks – Butterflies are added for sweet dreams
- Low Temperature Hot Glue – Using a hot glue gun allows for the items added to be secured
- Scissors – We recommend adult supervision
Instructions
- Step 1 – For the 3″ dream catchers, you’ll want to cut your embroidery floss about 18-24″ in length. For the larger, 6″ hoop, you will want to cut your embroidery floss about 30-36″ in length.
- Step 2 – Once your embroidery floss is cut, attach a small dab of glue to the back of the hoop.
- Step 3 – Gently press the embroidery floss into the glue and let set to harden on the rim. Loop the floss around the hoop wrapping in any and all directions. Secure the remaining tail or last knot on the back of the hoop with hot glue.
- Step 4 – Trim the excess. Repeat for the desired number of colors, attaching it to a different area on the back of the hoop when you begin. When you are finished, cut pieces of embroidery floss and weave them through the bottom of the hoop.
- Step 5 – Tie the remaining end around feathers and attach pom poms if desired. Add additional feathers and if you want to be creative, braid three pieces of floss together to create a different look.
- Step 6 – Add pom poms and butterflies to your dream catcher to encourage sweet dreams even at the bottom of the dream catcher! Finally add embroidery floss to the top with knot for the hoop to hang!
Notes
- Thread Wooden Beads on the embroidery floss with a needle if needed
- You can also use yarn instead of embroidery floss
- Add your favorite color of ribbons
- Gemstones are always a great addition Fold a piece of suede lace for a beautiful addition
- Other additions include leather, colorful fabric, and twine. Use a hole punch so you can thread on the dreamcatcher
dream catchers are cute and east to make.