You have to try Salt Painting for Kids if you are looking for a fun activity without a lot of supplies or expense. This activity is super easy but provides a ton of fun for children.

I’m always trying to come up with new ideas and crafts to do with the kids and we recently tried salt painting. We love to do activities that are fun but don’t require a ton of supplies or expense.
We learned how to make puffy paint and now it’s time for Salt Painting. It’s a really fun activity and it’s always a big hit.
You will probably have most of the supplies on hand so it’s all very easy to put together. This is an inexpensive activity but will keep the kiddos attention for quite some time. It is so much fun.
Table of contents
Why We Love This
This activity involves kids making a design out of glue and then salt is sprinkled over the design. Watercolors complete the design for a gorgeous craft project.
I use Crayola watercolors, but you can use the brand you prefer. It’s such a simple project and so cheap to make that you will love doing this! You can make scribbles, squiggles, designs, nature scenes and more.
Don’t forget to use card stock for the best experience because you need something that will hold up to the salt and paint. Regular paper will be too thin.
It’s a great way to introduce kids to new process art activities and art techniques. You can also use it as a way to show kids the property of absorption whether it be on a paper towel, sponge or paper.
Materials

- White glue. Just regular school glue.
- Salt. Plain table salt.
- Watercolor paints. Any color you prefer.
- Card stock. Thick paper is best.
Step By Step Instructions

Step 1. Use white glue to draw a design or picture onto a piece of card stock. I like to cut small pieces that fit onto a paper plate.

Step 2. Once you are finished with your glue drawing, liberally sprinkle salt crystals onto the glue. Gently shake the excess salt onto the paper plate and set aside.
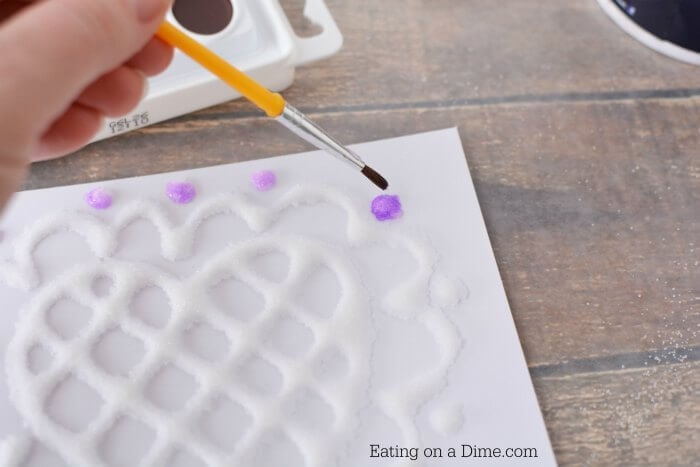
Step 3. Place your salt covered cardstock onto a flat surface covered with newspaper or wax paper. You can also place the paper on cardboard or poster board. Use watercolor paints and gently use a paint brush on the salt-covered glue lines. This is so neat to see the picture come together with lots of gorgeous colors. It is like magic.

Step 4. You won’t need a lot of water on the paintbrush, but the more pigment color you have on your brush the better. Once finished, set aside this fun kid’s craft so the watercolor paint mixture can dry completely.
Pro Tips
- Drying Process. Allow ample time for the moisture to dry on the artwork.
- Excess Salt. Make sure to let the excess salt fall off before painting. You can pour into a baking dish to reuse on more pictures.
- Water. Don’t use too much water or drying time will take longer, and the paper may deteriorate. Y
- Place the paper on a tray or plate. It is helpful to put the paper on something. You can use cardboard, paper plate, tray or any type of sturdy art surface.
- Thick paper. Use cardstock or thick paper for this watercolor technique craft.
Try More Easy Crafts for Kids
- Easy Homemade Playdough Recipes
- 25 Boredom Busters for Kids (to do indoors)
- Tissue Paper Crafts for Kids
- Easy Homemade Playdough Recipes
- How to make Fluffy Slime
Make Salt Art today and see all the different creations you can make. Kids of all ages enjoy doing this activity! It’s a blast to make and our favorite art activity.
Salt Painting
Equipment
- white glue
- table salt
- watercolor paints
- card stock
Instructions
- Use white glue to draw a design or picture onto a piece of card stock. I like to cut small pieces that fit onto a paper plate.
- Once you are finished with your glue drawing, liberally sprinkle salt onto the glue.
- Gently shake off onto the paper plate and set the plate aside.
- Place your salt covered card stock onto a flat surface covered with newspaper or wax paper.
- Use watercolor paints to gently paint onto the salt. This is so neat to see the picture come together with lots of gorgeous colors.
- You won’t need a lot of water, but the more pigment color you have on your brush the better. Once finished, set aside to dry completely.


👍🏼👍🏼👍🏼❤️ AWESOME!! THANKS for Sharing 😊 This Looks Like fun!! The grandkids are out of school now And can do ALL sorts of fun things in Between sports AND miscellaneous summer fun . I Found Some GREAT slime recipe on Pinterest And my Grandkids LOVED it 👍🏼❤️ Thanks And G-d Bless ❤️
You’re welcome! Thanks for the comment Cheri
Will this work on a canvas panel board?
Yes, I think it would work great. Thanks Betty!
Do you let the glue dry before painting it?
Thanks for sharing, my girls, ages 4 and 7 loved this! They each sat and did 3 pictures. Love that it was easy set up and I had all supplies on hand.
Great to hear! Thanks for sharing.
GOOD MORNING,
I WOULD LIKE TO KNOW IF YOU CAN LET THE GLUE/SALT DRY BEFOR PAINTING??? SORRY I ALWAY TYPE IN CAPS, JUST EASIER FOR ME.
I AM PLANNING THIS FOR OUR LETTER “J” WEEK SOON.
THANK YOU!
You can let it dry. The salt is what soaks up the paint so it should still work great. Thanks.
This looks like such a cool activity! I have a mixed age group in my after school program and I am a little concerned about how well the younger kids will do with it, but sometimes they surprise me :). I love that I have everything I need to run it already!
Can you dry the salt and glue before painting?
yes you can, but it will react differently.