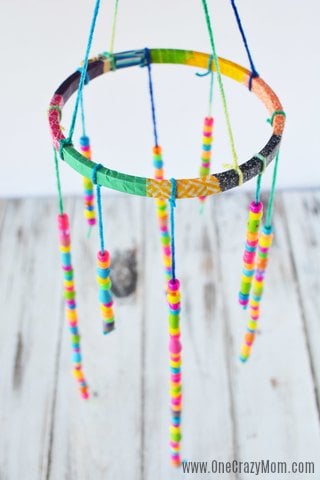
Make these fun and whimsical DIY Wind Chimes. Let the kids help and you have a fun activity and gorgeous wind chimes.

DIY Wind Chimes
This lovely wind chime craft is very simple to make! You can use these as decor and have fun making them.
If you are looking for a shabby chic project, this is a great project for you! This easy project is a great way to use what you have.
Don’t throw away any of your supplies because you never know what you might need. These beautiful wind chimes use what you already have around the house.
From bottle caps and plastic bottles to faux pearls and glass shells, they all can be used to make this wind chime even more gorgeous.
These do not actually chime but you can use fishing line to attach copper tubing, a piece of driftwood, sea glass, silver spoons and more if you want them to chime. I think driftwood wind chimes or sea glass wind chimes would be so pretty.

Wind chimes diy are so simple and really fun to make. This easy project will not only look pretty but when the wind blows it sounds so cool if you attach a few sea shells or other items.
A gentle breeze is all it takes to set these wind chimes in motion.

Materials needed for DIY Wind Chimes:
- 6″ embroidery hoop
- washi or other decorative tape
- yarn
- beads (pony beads work best)
- pom poms
- hot glue
- scissors
- ruler
- clear tape
How to make windchimes:

- Step 1. Wrap embroidery hoop with washi tape. You can use one color or multiple colors to make it fun.


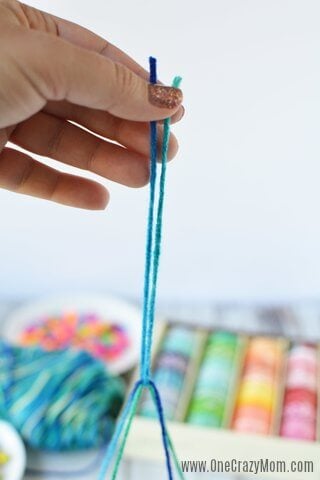
- Step 2. Create the hanging yarn. Cut 2 pieces of yarn, 24″ in length. Tie each end of one piece of yarn to opposite sides of the embroidery hoop.

- Step 3. Repeat tying the other piece of yarn perpendicular to the first and on the opposite side of the hoop. You’re yarn will now be in a plus sign shape.
- Step 4. Cut 1 piece of yarn 12″ and loop it between where the two intersecting pieces of yarn cross. Tie into a slip knot.

- Step 5. You should now be able to hold up the smaller, 12″ piece of tied yarn and hang the hoop.
- Step 6. Add yarn to the hoop with beads. Cut Different lengths of yarn, usually around 12″ and 18″ and tie the onto the hoop. I have 8 different pieces of yarn on my hoop.
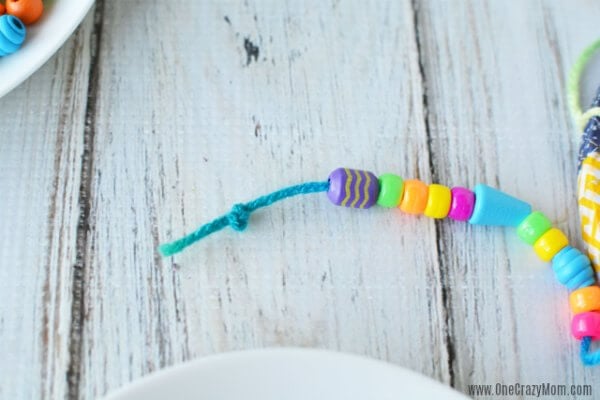
- Step 7. To make it easier to thread the beads onto the yarn, wrap a piece of tape on the end of the yarn to create a “needle” (similar to a shoe lace end) and thread the beads onto the yarn. When finished threading beads, double knot the end so the beads don’t fall off.


- Step 8. Repeat until you have the desired number of hanging beads.

- Step 9. Add hot glue to pom poms and attach to the bottom of the beaded yarn.
- Step 10. Trim excess yarn on your wind chime where you tied it onto the embroidery hoop and pom poms. Hang as desired.

Tips for DIY wind chimes:
- Pony Beads. You will need to use pony beads if using yarn because you will need something with a large hole.
- Large needle. Alternately you can thread the yarn onto a large needle, just make sure the needle fits into the bead as well. The other option would be to use a string or baker’s twine which is a thinner string than yarn.

Variation ideas
- Wind Chime ideas. Think outside the box and gather up items around the house you already have. Seashells, old jewelry, metal washers and items that might make a little noise are perfect to make these “chime”.
- Beads and washi tape. Set out lots of beads and fun washi tape. Everyone can choose what they like and make their very own set in their favorite colors.
- Flower Pot. You can use upside down terra cotta to hang from the wind chimes. Use spray paint to make brightly colored options. You can buy small mini sizes from local hardware stores or garden centers.
I think it would even be a fun birthday party idea for older kids that love crafts. It would be a fun activity and also serve as their party favor to take home!
This DIy is so fun and easy.
Give this fun kid’s craft a try and let us know what you think. Where will you hang your unique wind chimes?
This easy diy is super easy and fun.

Print this DIY Wind Chimes below:
DIY Wind Chimes
Equipment
- 6″ embroidery hoop
- washi or other decorative tape
- yarn
- beads (pony beads work best)
- pom poms
- Hot Glue
- Scissors
- ruler
- clear tape
Instructions
- Wrap embroidery hoop with washi tape. You can use one color or multiple colors to make it fun.
- Create the hanging yarn. Cut 2 pieces of yarn, 24″ in length. Tie each end of one piece of yarn to opposite sides of the embroidery hoop.
- Repeat tying the other piece of yarn perpendicular to the first and on the opposite side of the hoop. You’re yarn will now be in a plus sign shape.
- Cut 1 piece of yarn 12″ and loop it between where the two intersecting pieces of yarn cross. Tie into a slip knot.
- You should now be able to hold up the smaller, 12″ piece of tied yarn and hang the hoop.
- Add yarn to the hoop with beads. Cut Different lengths of yarn, usually around 12″ and 18″ and tie the onto the hoop. I have 8 different pieces of yarn on my hoop.
- To make it easier to thread the beads onto the yarn, wrap a piece of tape on the end of the yarn to create a “needle” (similar to a shoe lace end) and thread the beads onto the yarn. When finished threading beads, double knot the end so the beads don’t fall off.
- Repeat until you have the desired number of hanging beads.
- Add hot glue to pom poms and attach to the bottom of the beaded yarn.
- Trim excess yarn on your wind chime where you tied it onto the embroidery hoop and pom poms. Hang as desired.


