Learn how to make a DIY welcome sign for your front porch. The entire project is budget friendly and so easy.

DIY Welcome Sign
Today, I am going to show you how to make this super frugal DIY Welcome Sign. It is a great way to dress up your front porch without spending a ton of money.
If you want to spruce up your porch, this is the perfect DIY to try. Don’t spend a ton of money on custom signs when you can easily make a wooden welcome sign yourself.
This is such a cute welcome banner to dress up your front door. I think you will love how it turns out and how inexpensive it is.
Let’s get started.
This easy vertical welcome sign will be the perfect porch decoration at your house. It seems a wood welcome sign never goes out of style. Make this classic sign today for your porch.

Supplies for DIY Porch sign
- 6ft common board
- 9″ cardboard letter stencils
- Any two colors of paint samples (Behr and Valspar have great ones – You can also find paint samples on Amazon for around $5 shipped)
- Foam paint brush
- Small tipped paint brush
- Fine grit sand paper
- Pencil

How to make a welcome sign:
- Lightly sand the front and edges of a piece of wood with sand paper.
- Dust off your board and begin painting the lightest color you choose. Use your foam paint brush for this step.
- Let your board dry. This will take about 30 to 45 minutes.
- Place your letter C in the center of your board and trace lightly with a pencil. Starting with this letter will help to make sure everything is correctly centered.
- Now that you know where the center of your board is, you can start adding your other letters to spell welcome. Lightly trace them as well. You can use transfer tape to help if needed with the stencil.

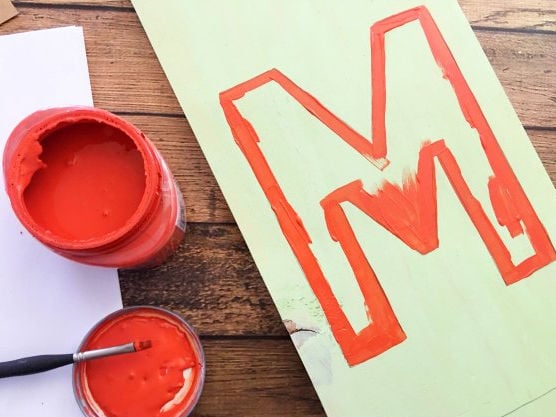
- Next, using your small tipped paint brush, begin outlining your letters with your second paint choice. Then fill each letter in.
- There isn’t a need for a second coat. Once your letters have dried, begin lightly sanding the whole board to get a vintage effect. This is super trendy and really gives it the farmhouse look.

- Finally, place the sign on your front porch for the perfect decoration all year long. It will be a really pretty focal point on your porch.
Painting words is a lot easier than you think.
With this easy technique, you will be a pro at painting words on wood. You can make all kinds of adorable signs for your family.
This would be a great activity when you are feeling crafty. Don’t let the idea of painting scare you off. You don’t need any experience at all.
Variation ideas:
- Painting quotes on wood is easy too. You can take this same easy technique and start painting quotes on wood. This is a great way to make even more fun signs for your front porch or for around your house.
- Try other words. “Home” is another fun sign to make. You can either paint the “O” or leave it off and use a seasonal wreath in its place. You can change the wreath as the seasons change for a great sign year round.
- Cutting machine. If you have a cricut or silhouette machine, you can use a svg file to create vinyl letters. This is another option for this sign if you do not want to paint the letters using stencils. You can find many different types of cut file online usually.
- Pallet wood. If you have pallets, break it a part to make a sign. It is a great way to use pallet wood and create this for very little expense.
- Attach a small galvanized container or mason jar to the sign. Leave a little room above the “W”. You can put flowers in this and change them based on seasons and holidays. This is an easy way to jazz up the sign even more.
- Fonts. Stencils come in lots of different fonts and options. Feel free to choose the one you like the best.
- Make it reversible. Go ahead and make something on the back of the sign too. You can have something seasonal on the back like “Merry Christmas”.
Another idea is to put welcome on one side and home on the other for options at your fingertips. You can flip the sign based on the one you plan to use.
- Try different colors. If you have a favorite sports team, paint the sign in team colors. The ideas are endless.
- Happy Birthday sign. Another idea is to make a sign to celebrate birthdays. It would be so festive to put this on the porch every time someone has a birthday. This will definitely make their special day even better.
How much did this cost?
I already had the wood, and the paint samples.
I just had to pay for the sandpaper and the stencil. That means this easy project cost me less than $5 to make! Now you know that is easy and frugal.
You can make this too without any special skills required. It is very simple to make. By making your own sign, the savings will most certainly add up.
Even if you have to buy the wood and paint, it is still very frugal to make. Anyone can make this even on a tight budget.
Tips and tricks:
- If your sign will be exposed to the weather, make sure to use outdoor paint. You might also want to use a sealer on it.
- Allow ample time for the sign to dry before sanding it. It also needs to be completely dry before placing outside.
- Skip sanding if you do not like the distressed finish. This is optional and totally based on your preference. You can opt to sand it even more if you prefer that look. This sign is super easy to make based on your preference.
- Use painters tape to keep your stencils in place. This holds much better than regular tape and will make the project so much easier.
- You can use a paint pen to outline the letters instead of a paint brush. It isn’t necessary but some people might find it easier. Just use what works best for you.
- Don’t worry if you mess up the letters. You can cover it up with paint and no one will ever know. This project is so easy.
Host a Paint night.
Another fun idea is to have a group of friends over. Everyone can make their own sign. This would be a blast for the next girl’s night.
Everyone can get together and paint. I bet you can even do this seasonally so everyone can paint a new sign.
It will be so much fun and an inexpensive way to get everyone together. Have a few snacks, paint and just enjoy being together.
This is a fun sign to make.
Now that you know how easy it is to make these signs, you can skip the store. Save your money and make one instead.
I have spotted these signs at local stores, craft fairs and more. They always seem pricey to make. It is crazy how inexpensively you can actually make one.
Plus, they are super easy as well. Anyone can make this. You don’t need any special gadgets or tools.
No need for tons of hours or money needed. This is truly a simple and frugal sign to make.
Get started today and let us know how it turned out. We love hearing all about your projects and new ideas.

More DIY Projects:
- DIY Blanket Ladder
- How to make Burlap Wreath
- Easy DIY Wind Chimes
- How to Make Fabric Wreath – 10 Minute Scrap Fabric Wreath
- DIY last name sign

DIY Welcome Sign
Equipment
- 6ft common board
- 9″ cardboard letter stencils
- Any two colors of paint samples (Behr and Valspar have great ones – You can also find paint samples on Amazon for around $5 shipped)
- Foam paint brush
- Small tipped paint brush
- Fine grit sand paper
Instructions
- Lightly sand the front and edges of a piece of wood with sand paper.
- Dust off your board and begin painting the lightest color you choose. Use your foam paint brush for this step.
- Let your board dry. This will take about 30 to 45 minutes.
- Place your letter C in the center of your board and trace lightly with a pencil. Starting with this letter will help to make sure everything is correctly centered.
- Now that you know where the center of your board is, you can start adding your other letters to spell welcome. Lightly trace them as well. You can use transfer tape to help if needed with the stencil.
- Next, using your small tipped paint brush, begin outlining your letters with your second paint choice. Then fill each letter in.
- There isn’t a need for a second coat. Once your letters have dried, begin lightly sanding the whole board to get a vintage effect. This is super trendy and really gives it the farmhouse look.
- Finally, place the sign on your front porch for the perfect decoration all year long. It will be a really pretty focal point on your porch.