We are going to learn how to make a Burlap Christmas Wreath and it is so simple to do. Spruce up your home for the holidays!

I love easy wreath ideas and this one is very simple. It turns out so pretty and you can easily customize it to suit your taste and home decor.
Once you have the base down, it’s all just adding accessories and fun embellishments. This idea is so easy to put together with simple step by step instructions.
It turns out gorgeous without much work. You can easily make one for Christmas and other holidays or seasons. We have another easy DIY Burlap Wreath idea you can make for under $15.
Table of contents
Why We Love This
The cool thing about this wreath idea is once you know how to do the base, it is easy to modify for any time of year. This wreath starts out with a basic wire wreath frame with burlap ribbon to make it nice and full.
The Believe sign is really darling on the wreath along with greenery and berries. It comes together quickly and looks so pretty.


Wreath Supplies
- 1 wire wreath frame (14″ diameter)
- burlap rolls of ribbon or garland (6″ wide x 30′ long) floral wire
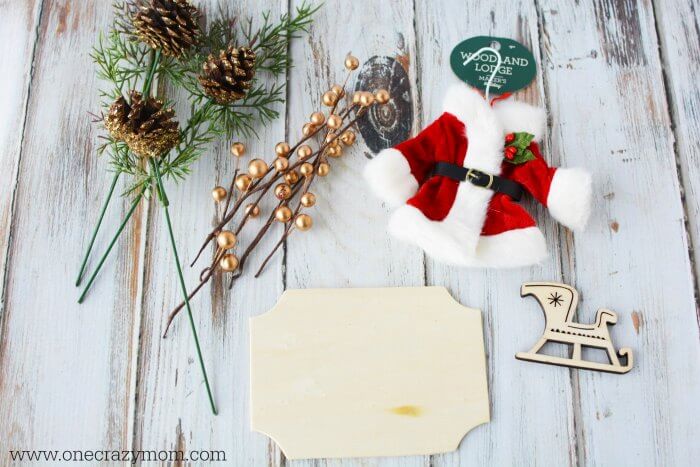
- floral pine cones
- gold berries
- hot glue and hot glue gun
- wood sled cutout
- holiday craft wood shape
- small Santa suit
- ornament
- chalkboard paint
- red acrylic paint
- paint brush
- chalk
Step By Step Instructions

Step 1. Place your wire wreath form onto a flat surface.

Step 2. Then, fold one end of your burlap or burlap fabric in quarters. Slide a small piece of wire through the end of the burlap ribbon and attach it to the inside portion of the wire frame by twisting it on tightly.

Step 3. Begin to weave the burlap into each section of the frame. Start from the inside of the frame and move to the outside. As you put the burlap into each section of the wreath form, pucker it out so it forms a bubble.

Step 4. Once finished, grab the 3 loops and squish them together in your hand. Flip over the wreath so you are now working on the back of the frame. Twist the loose end of the burlap 3 times, and push the burlap through the sections of the wire frame again.

Step 5. Repeat the process of scrunching, holding and twisting the burlap. I placed 3 sets of burlap loops into each of my 6 sections on my wire frame.

Step 6. Add the Santa suit by attaching with hot glue. Tuck in some pinecones and gold beads to add different colors. Finally, attach with hot glue or simply weave into the burlap.

Step 7. Paint the wood sign with 2 coats of chalkboard paint. Next, let it dry between each coat.

Step 8. Add water to the red paint to lightly wash the wood sleigh cutout. Let dry completely. Attach the sleigh to the sign with hot glue. Then attach the sign to the wreath with hot glue.

Step 9. Finally, write on the sign with chalk. (Believe, Joy to the World, Be Merry, etc).

Step 10. Attach to the wreath. Tuck additional pinecones and gold berries around the sign of the DIY Christmas Wreath. You can also use a pipe cleaner or a small piece of floral wire to secure embellishments.

How to Hang
You can use a nail to hang the wreath, but I prefer to use wreath hanger. It doesn’t mess up the door and it’s simple to take off.
Pro Tips
- Use hot glue to securely fasten decorations.
- The embellishments should not be too heavy or it will be hard to secure.
- Wire ribbon is best for bows as it is sturdier.
Variation Ideas
- Holidays. Try using colored burlap to create wreaths for other holidays. You can easily make fall wreaths with pumpkins, spring and more.
- Seasonal. Coordinate colors to seasons and special occasions.
- Flowers. You can use any type of flowers you prefer.
- Deco Mesh. Substitute this instead of burlap.
- Bow. Add a bow using wired ribbon to your wreath for another great idea.
More Easy Wreath DIY Projects
- 10 Minute Scrap Fabric Wreath
- How to Make Pool Noodle Wreath
- Easy to make Star Shaped 4th of July Wreath
- DIY Easter Egg Wreath Tutorial
Make this festive Burlap Christmas Wreath for your front door. Then leave a comment letting us know how it turned out.


