Skip the store and learn How to Make a Pop Up Card at home. These are so fun to make and receive for any occasion.

There is something so fun and whimsical about a pop-up card. I have always loved these cards, but they can be pricey at the store!
Whether it is a birthday, holiday or just to brighten someone’s day, these cards are great. Everyone loves a pop up card and they are sure to bring a smile to someone’s face. I also love to make Tissue Paper Flowers.
This is such an easy card tutorial.
Why We Love This
We are going to show you how to make a pop up card that is super easy. This is a great DIY to do together with the kids.
This is a fun and easy card that everyone loves receiving as well! Get started today and make one all year long for special occasions, holidays and more.
This template is easy to follow, and the card idea is perfect for Mom for a Mother’s Day Card, Christmas, Halloween, wedding card, Valentine’s Day card and more. Anyone including beginners can make this easy pop up card for celebrations.
Supplies

- 2 Pieces of Paper. You can use a piece of card stock or construction paper in the colors of your choice. I’m using blue and white for this card.
- Ruler
- Scissors and Edging Scissors. Optional but creates a fun edge.
- Glue. You can use a glue stick if you prefer.
- Sharpies or Markers. This is for decorations.
- Stickers or Washi Tape. This is for decorations. I like to use glitter stickers for embellishments.
Step By Step Instructions

Step 1. First, cut the 2 pieces of paper to make the card.

Step 2. I like to cut the outside paper (blue) to 8.5 x 6 and the inside paper (white) to 8 x 5.5. This will allow the card to fit into a 6X4 envelope for mailing it.

Step 3. Then take the inside color and fold the single sheet of paper in half lengthwise. On the middle crease just created, draw 4 lines measuring 4 cm, 3 cm, 2 cm and 1 cm. I made each of these lines approximately 2 cm apart and they are 3 cm from the top and the bottom of the second piece of paper.

Step 4. Then gently cut on the lines on the folded side of the paper until you have parallel cuts. Try to cut in straight lines.

Step 5. Fold lines on both sides to create the creases.

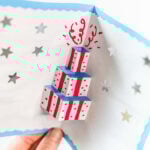
Step 6. Then open up the middle insert and push these rectangles forward and fold them down gently to create the birthday cake on the side of the card. Each single slit will pop out from the extra cuts.

Step 7. Decorate the birthday cake with the markers and the stickers. You can draw balloons with crayons for a birthday. This is a great time to write a happy birthday message as well.

Step 8. Next, fold the outside color paper in half lengthwise. Finally glue the middle insert onto the outside color (blue sides) with the glue. The end result will brighten someone’s day.

Pro Tips
- Sizing. I like to cut the outside color of paper to 8.5 x 6 and the inside color to 8 x 5.5. This will allow the card to fit into a 6X4 envelope for mailing it! If you plan to mail these cards or just want them to easily to fit inside a standard card envelope, I suggest doing the same.
- Smaller inner paper. I like to make the inside color slightly smaller so it will create a banner around the inside of the card.
- Edging Scissors. I used paper edging scissors to give the inside color a fun design but you can use regular scissors as well if you like. Feel free to use your creativity for so much fun.
- Cutting Mat. If you prefer to do other designs and variations, a cutting mat is helpful for basic shapes. This will allow you to use a scalpel knife to make other simple shapes. I like to make a pop-up heart card for valentine’s day and this is easier using a knife because you can cut at an angle.
- Shapes. There is an astonishing variety of shapes you can try to make more cards. From a silhouette to a dove or even the statue of liberty with Brooklyn bridge and a school bus. You can even just do your own shape such as a symmetrical triangle or rectangle shape. Beginners might want to try simple triangles for a new design and to practice extra cut-outs and horizontal planes.
- Paper. The actual pop up is easier with sturdy paper. I like to always have extra paper on hand in case I make a mistake making my favorite cards.
- Rough Draft. You may want to sketch a very rough sketch on another piece of paper if you are doing a more complex pop-up with a series of steps.
- Decorate last. I don’t recommend starting out with graphics and decorations. Wait to add those until you have finished the pop up potion.
How Do Pop Up Cards Work?
The tabs created allow the card to close flat but to “pop up” when opened. This is a blast to make and so fun to receive.
The layers of paper create such a neat card and work for any occasion all year long. I know that I love receiving homemade cards and gifts.
More Fun Crafts to Try


Surprise someone with one of these cute and fun Pop-Up Cards. Don’t forget to come back and leave a comment once you do.
How to Make a Pop Up Card
Equipment
- 2 Pieces of Paper. You can use a piece of card stock or construction paper in the colors of your choice. I’m using blue and white for this card.
- ruler
- Scissors and Edging Scissors. Optional but creates a fun edge.
- Glue. You can use a glue stick if you prefer.
- Sharpies or Markers. This is for decorations.
- Stickers or Washi Tape. This is for decorations. I like to use glitter stickers for embellishments
Instructions
- Step 1. First, cut the 2 pieces of paper to make the card.
- Step 2. I like to cut the outside paper (blue) to 8.5 x 6 and the inside paper (white) to 8 x 5.5. This will allow the card to fit into a 6X4 envelope for mailing it.
- Step 3. Then take the inside color and fold the single sheet of paper in half lengthwise. On the middle crease just created, draw 4 lines measuring 4 cm, 3 cm, 2 cm and 1 cm. I made each of these lines approximately 2 cm apart and they are 3 cm from the top and the bottom of the second piece of paper.
- Step 4. Then gently cut on the lines on the folded side of the paper until you have parallel cuts. Try to cut in straight lines.
- Step 5. Fold lines on both sides to create the creases.
- Step 6. Then open up the middle insert and push these rectangles forward and fold them down gently to create the birthday cake on the side of the card. Each single slit will pop out from the extra cuts.
- Step 7. Decorate the birthday cake with the markers and the stickers. You can draw balloons with crayons for a birthday. This is a great time to write a happy birthday message as well.
- Step 8. Next, fold the outside color paper in half lengthwise. Finally glue the middle insert onto the outside color (blue sides) with the glue. The end result will brighten someone’s day.